
Google has brought Android Nougat to its second iteration with the 7.1 version (API 25), but this one is not a minor release, as a matter of fact it bundles some interesting features under the hood. One of these extra features is App Shortcuts.
TL;DR
- App Shortcuts are great for exposing actions of your app and bring back users into your flow
- they can be static or dynamic
- static are set in stone once you define them (you can only update them with an app redeploy)
- dynamic can be changed on the fly
- you can create a back stack of activities once you open one through a shortcut
- shortcuts can be reordered, but only in their respective type and static shortcuts will come always at the bottom as they're added first (there's no
rankproperty to be defined on them) - the labels of the shortcuts are
CharSequenceso you can manipulate them through spans
You can checkout this blog post's sample app here
If you want to go through a step by step guide of how I did it, please read on.
What and why?
App Shortcuts is a means of exposing common actions or tasks of your application to the launcher. Your users can reveal the shortcuts by long-pressing the app's launcher icon.
They are of two types:
- static: defined statically in a resource file; cannot be changed unless you modify the file and redeploy the app
- dynamic: published at runtime; shortcuts can be updated without the need of redeploying the app
Note: you can only have up to 5 shortcuts for one app
By exposing your common tasks you'll make it easier for your users to get back into your app directly where they want without the need of additional navigation.
How?
Adding shortcuts to your app is pretty straight forward. Let's start with creating a simple static shortcut.
Note: You'll have to use a Android Nougat 7.1 device with a launcher that supports shortcuts (like the Pixel launcher or the Now launcher)
Static shortcuts
I assume you already have or created a new project in Android Studio. Navigate to your AndroidManifest.xml and add the following meta-data tag to your main activity:
<?xml version="1.0" encoding="utf-8"?>
<manifest xmlns:android="http://schemas.android.com/apk/res/android"
  package="com.catinean.appshortcutsdemo">

  <application
    android:allowBackup="true"
    android:icon="@mipmap/ic_launcher"
    android:label="@string/app_name"
    android:supportsRtl="true"
    android:theme="@style/AppTheme">
    <activity android:name=".MainActivity">
      <intent-filter>
        <action android:name="android.intent.action.MAIN" />

        <category android:name="android.intent.category.LAUNCHER" />
        <category android:name="android.intent.category.DEFAULT" />
      </intent-filter>

      <meta-data
        android:name="android.app.shortcuts"
        android:resource="@xml/shortcuts" />
    </activity>
  </application>

</manifest>
In the meta-data, tag the android:resource key corresponds to a resource defined in your res/xml/shortcuts.xml. Here you need to define all of your static shortcuts. Let's add one that will open a certain activity from your app (in my case I've created a dummy StaticShortcutActivity):
<?xml version="1.0" encoding="utf-8"?>
<shortcuts xmlns:android="http://schemas.android.com/apk/res/android">
  <shortcut
    android:enabled="true"
    android:icon="@drawable/ic_static_shortcut"
    android:shortcutDisabledMessage="@string/static_shortcut_disabled_message"
    android:shortcutId="static"
    android:shortcutLongLabel="@string/static_shortcut_long_label"
    android:shortcutShortLabel="@string/static_shortcut_short_label">
    <intent
      android:action="android.intent.action.VIEW"
      android:targetClass="com.catinean.appshortcutsdemo.StaticShortcutActivity"
      android:targetPackage="com.catinean.appshortcutsdemo" />
  </shortcut>
</shortcuts>
You can see that the root tag of this file is <shortcuts>, which can hold multiple <shortcut> blocks. Each of them, as you may have guessed, represents a static shortcut. Here, the following properties can be set on one shortcut:
enabled: as the name states, whether the shortcut is enabled or not. If you decide to disable your static shortcut you could either set this tofalse, or simply remove it from the<shortcuts>seticon: the icon shown on the left hand side of the shortcut. In my case, I created a simple Vector Drawable from within Android Studio and assigned it as an iconshortcutDisabledMessage: when you disable your shortcut, it will disappear from the ones that the user can reveal by long pressing your application icon, but one can pin a shortcut to the launcher (by long pressing and dragging it on the desired launcher page), so when disabled the pinned shortcut will appear greyed out and upon tapping it a Toast with this message will appearshortcutLongLabel: longer text of the shortcut shown when the launcher has enough spaceshortcutShortLabel: a concise description of the shortcut. The field is mandatory. Most probably this will be the one which will appear on your launcherintent: here you define your intent (or more intents) that your shortcut will open upon being tapped
Let's take a look how our static shortcut looks like:
Nice and easy, but you can notice that upon pressing back, the user is taken back to the launcher. What about rather getting back into the app? To do so, we can add multiple intent tags under the previous shortcut ones:
<?xml version="1.0" encoding="utf-8"?>
<shortcuts xmlns:android="http://schemas.android.com/apk/res/android">
  <shortcut
  ...>
    <intent
      android:action="android.intent.action.MAIN"
      android:targetClass="com.catinean.appshortcutsdemo.MainActivity"
      android:targetPackage="com.catinean.appshortcutsdemo" />
    <intent
      android:action="android.intent.action.VIEW"
      android:targetClass="com.catinean.appshortcutsdemo.StaticShortcutActivity"
      android:targetPackage="com.catinean.appshortcutsdemo" />
  </shortcut>
</shortcuts>
Notice how we added an extra <intent> before the one that we had, pointing to the MainActivity. This will create a back stack of intents, the last one being the one opened by the shortcut. In our case the back stack looks like MainActivity -> Static ShortcutActivity, so when pressing back the user is taken into the MainActivity:

Adding static shortcuts is pretty easy, now let's move on defining some dynamic ones.
Dynamic shortcuts
As their name suggests, the dynamic shortcuts can be modified at runtime without the need of redeploying your app. As you may have guessed, this ones are not defined through a static resource (shortcuts.xml) as the static ones, but created in code.
Let's add our first dynamic shortcut! In order to do so, you will have to make use of the ShortcutManager and the ShortcutInfo.Builder. I'll be constructing the first dynamic shortcut in my MainActivity.#onCreate():
@Override
protected void onCreate(Bundle savedInstanceState) {

    ...

    ShortcutManager shortcutManager = getSystemService(ShortcutManager.class);

    ShortcutInfo webShortcut = new ShortcutInfo.Builder(this, "shortcut_web")
            .setShortLabel("catinean.com")
            .setLongLabel("Open catinean.com web site")
            .setIcon(Icon.createWithResource(this, R.drawable.ic_dynamic_shortcut))
            .setIntent(new Intent(Intent.ACTION_VIEW, Uri.parse("https://catinean.com")))
            .build();

    shortcutManager.setDynamicShortcuts(Collections.singletonList(webShortcut));
}
Here we acquire the shortcutManager and construct a ShortcutInfo. By using the ShortcutInfo.Builder we can set various properties for the shortcut we want to create. All the builder methods we use above correspond to the same properties used for a static shortcut, so I won't be explaining them again. However, one property that is a bit hidden, is the id of the shortcut which is defined in the StaticInfo.Builder constructor as second parameter - shortcut_web. I've defined the Intent being one that will open my website. Finally, I set the dynamic shortcut on the ShortcutManager. Let's see now how our shortcuts look now:
Great! Now we have 2 app shortcuts in our app - one static and one dynamic.
Let's add another one that will point to an activity inside the app and see how we can create a back stack for it:
@Override
protected void onCreate(Bundle savedInstanceState) {

    ...

    ShortcutInfo dynamicShortcut = new ShortcutInfo.Builder(this, "shortcut_dynamic")
            .setShortLabel("Dynamic")
            .setLongLabel("Open dynamic shortcut")
            .setIcon(Icon.createWithResource(this, R.drawable.ic_dynamic_shortcut_2))
            .setIntents(
                    new Intent[]{
                            new Intent(Intent.ACTION_MAIN, Uri.EMPTY, this, MainActivity.class).setFlags(Intent.FLAG_ACTIVITY_CLEAR_TASK),
                            new Intent(DynamicShortcutActivity.ACTION)
                    })
            .build();

    shortcutManager.setDynamicShortcuts(Arrays.asList(webShortcut, dynamicShortcut));
}
You can see now that we now setIntents() on the builder in order to build a back stack:
- the first intent corresponds to the
MainActivity. We specify aFLAG_ACTIVITY_CLEAR_TASKflag, in order to clear any existing tasks related to the app and make theMainActivitythe current root activity - the second one corresponds to the
DynamicShortcutActivity(which is just an empty activity that I created). In order to do so, we need to provide an Intent with a specificaction, which is defined as a staticStringinDynamicShortcutActivityand corresponds with theintent-filteraction defined inAndroidManifest.xmlfor the same activity:
<activity
      android:name=".DynamicShortcutActivity"
      android:label="Dynamic shortcut activity">
      <intent-filter>
        <action android:name="com.catinean.appshortcutsdemo.OPEN_DYNAMIC_SHORTCUT" />
        <category android:name="android.intent.category.DEFAULT" />
      </intent-filter>
</activity>
By declaring this array of intents in this order, we ensure that when the user presses back after opening DynamicShortcutActivity through the shortcut we created, the MainActivity will be opened.
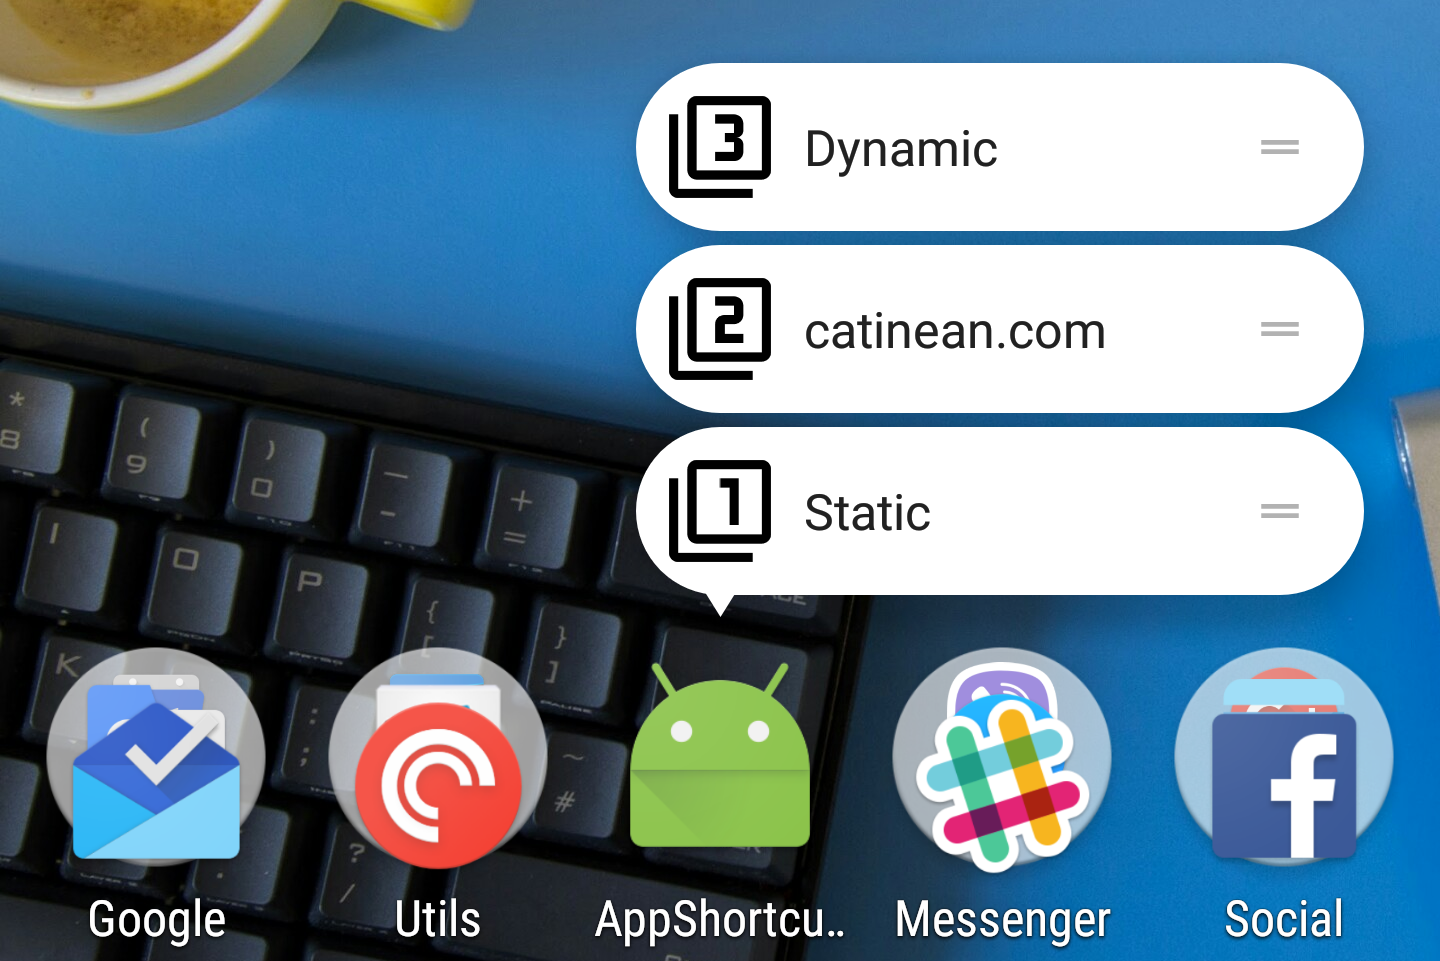
Let's see how they look like:

Shortcut ordering
Now that we have 1 static shortcut and 2 dynamic ones, how can we specify a custom order for them. Taking a closer look at the ShortcutInfo.Builder methods one in particular captures our attention: setRank(int). By setting a custom rank to a dynamic shortcut we can control the order they appear when revealed: the higher the rank, the most top the shortcut goes.
Say we want shortcut number 2 (catinean.com) to sit at the top. We can dynamically change the ranks of the already added dynamic shortcuts. Let's do this when pressing a button from MainActivity:
findViewById(R.id.main_rank_button).setOnClickListener(new View.OnClickListener() {

      @Override
      public void onClick(View view) {
          ShortcutInfo webShortcut = new ShortcutInfo.Builder(MainActivity.this, "shortcut_web")
                  .setRank(1)
                  .build();

          ShortcutInfo dynamicShortcut = new ShortcutInfo.Builder(MainActivity.this, "shortcut_dynamic")
                  .setRank(0)
                  .build();

          shortcutManager.updateShortcuts(Arrays.asList(webShortcut, dynamicShortcut));
      }
});
In the click listener of the button, we create new ShortcutInfo for each shortcut we have previously added, with the same IDs, but now we set a higher rank to the shortcut_web one and a lower one for shortcut_dynamic. Finally, we use the updateShortcuts(List<ShortcutInfo>) method of the ShortcutManager in order to update the shortcuts with the newly set ranks:

You can see from the above gif that the static shortcut sits at the bottom of the list. It turns out that you cannot change the rank of a static shortcut as they will be shown in the order they're defined in the shortcuts.xml file. Since we have only one static shortcut, it has the default rank of 0 which cannot be changed.
Extra bits
If we take a closer look at the setShortLabel(CharSequence) method of ShortcutInfo.Builder, we can see that it accepts a CharSequence as a parameter. What does this mean? Well, it means that we could play with it since we can attach custom spans to it.
Let's say we want to change it's colour to red when pressing the above created button. We can create a SpannableStringBuilder and set to it a ForegroundColorSpan with the desired colour and then pass the spannableStringBuilder as a shortLabel (as the SpannableStringBuilder is a CharSequence):
findViewById(R.id.main_rank_button).setOnClickListener(new View.OnClickListener() {

    @Override
    public void onClick(View view) {

        ForegroundColorSpan colorSpan = new ForegroundColorSpan(getResources().getColor(android.R.color.holo_red_dark, getTheme()));
        String label = "catinean.com";
        SpannableStringBuilder colouredLabel = new SpannableStringBuilder(label);
        colouredLabel.setSpan(colorSpan, 0, label.length(), Spanned.SPAN_INCLUSIVE_INCLUSIVE);

        ShortcutInfo webShortcut = new ShortcutInfo.Builder(MainActivity.this, "shortcut_web")
                .setShortLabel(colouredLabel)
                .setRank(1)
                .build();

        ...
    }
});

That's it for now.
Don't forget to check the demo app on Github