
When it was first launched, Android Wear stirred a lot of interest among the development community, especially among the developers who saw the opportunity of developing customised watchfaces for their smartwatches. Unfortunately, the first API realease didn't include official means of creating a watchface and those who wanted to achieve this had to implement various hacks and workarounds.
As of December 2014, Google has published the official Watch Face API for Android Wear so you don't have to find workarounds anymore.
This tutorial will guide you through the process of creating a digital watch face for your Android wear powered smartwatch. In this first part we will cover the basics of structuring your project and using the Wear API in order to create your first watchface.
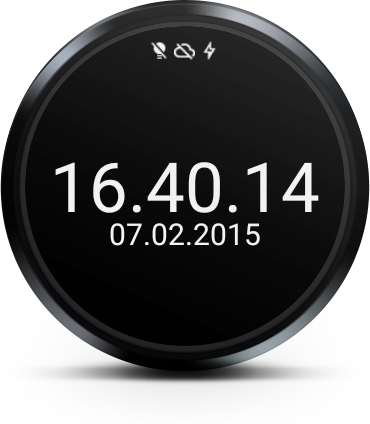
The final watch face will look like this, providing the current time and date:
Project creation
I assume that you have already installed Android Studio. If not, you can grab it from here.
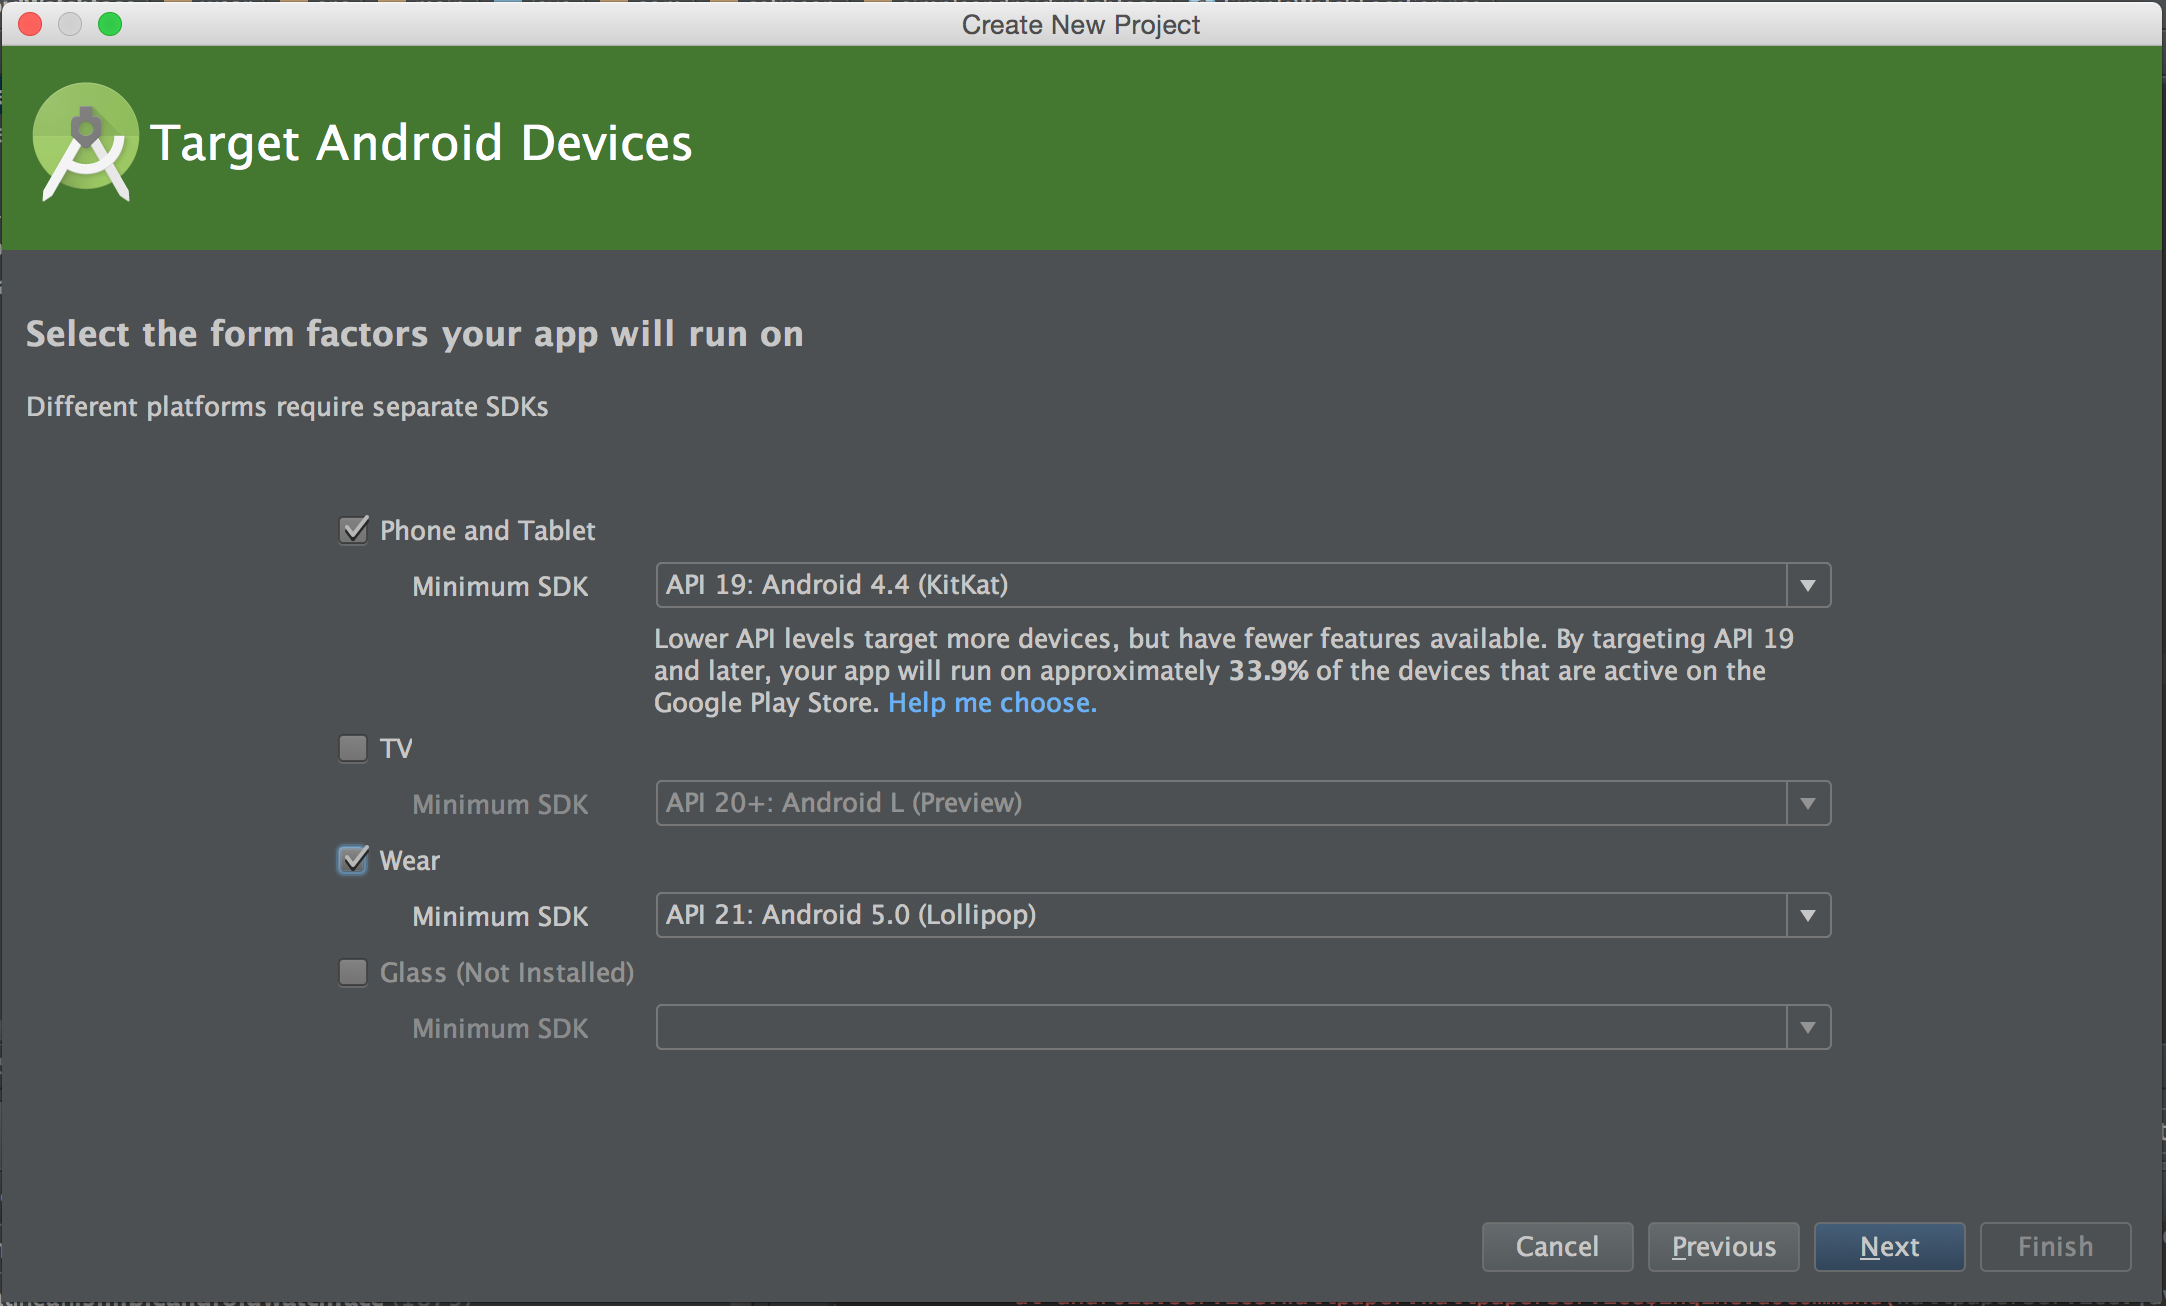
Start by creating a new project. Input your project name and package. Next, be sure to tick both Phone and tablet and Wear platforms on the Target Android devices screen as shown above.
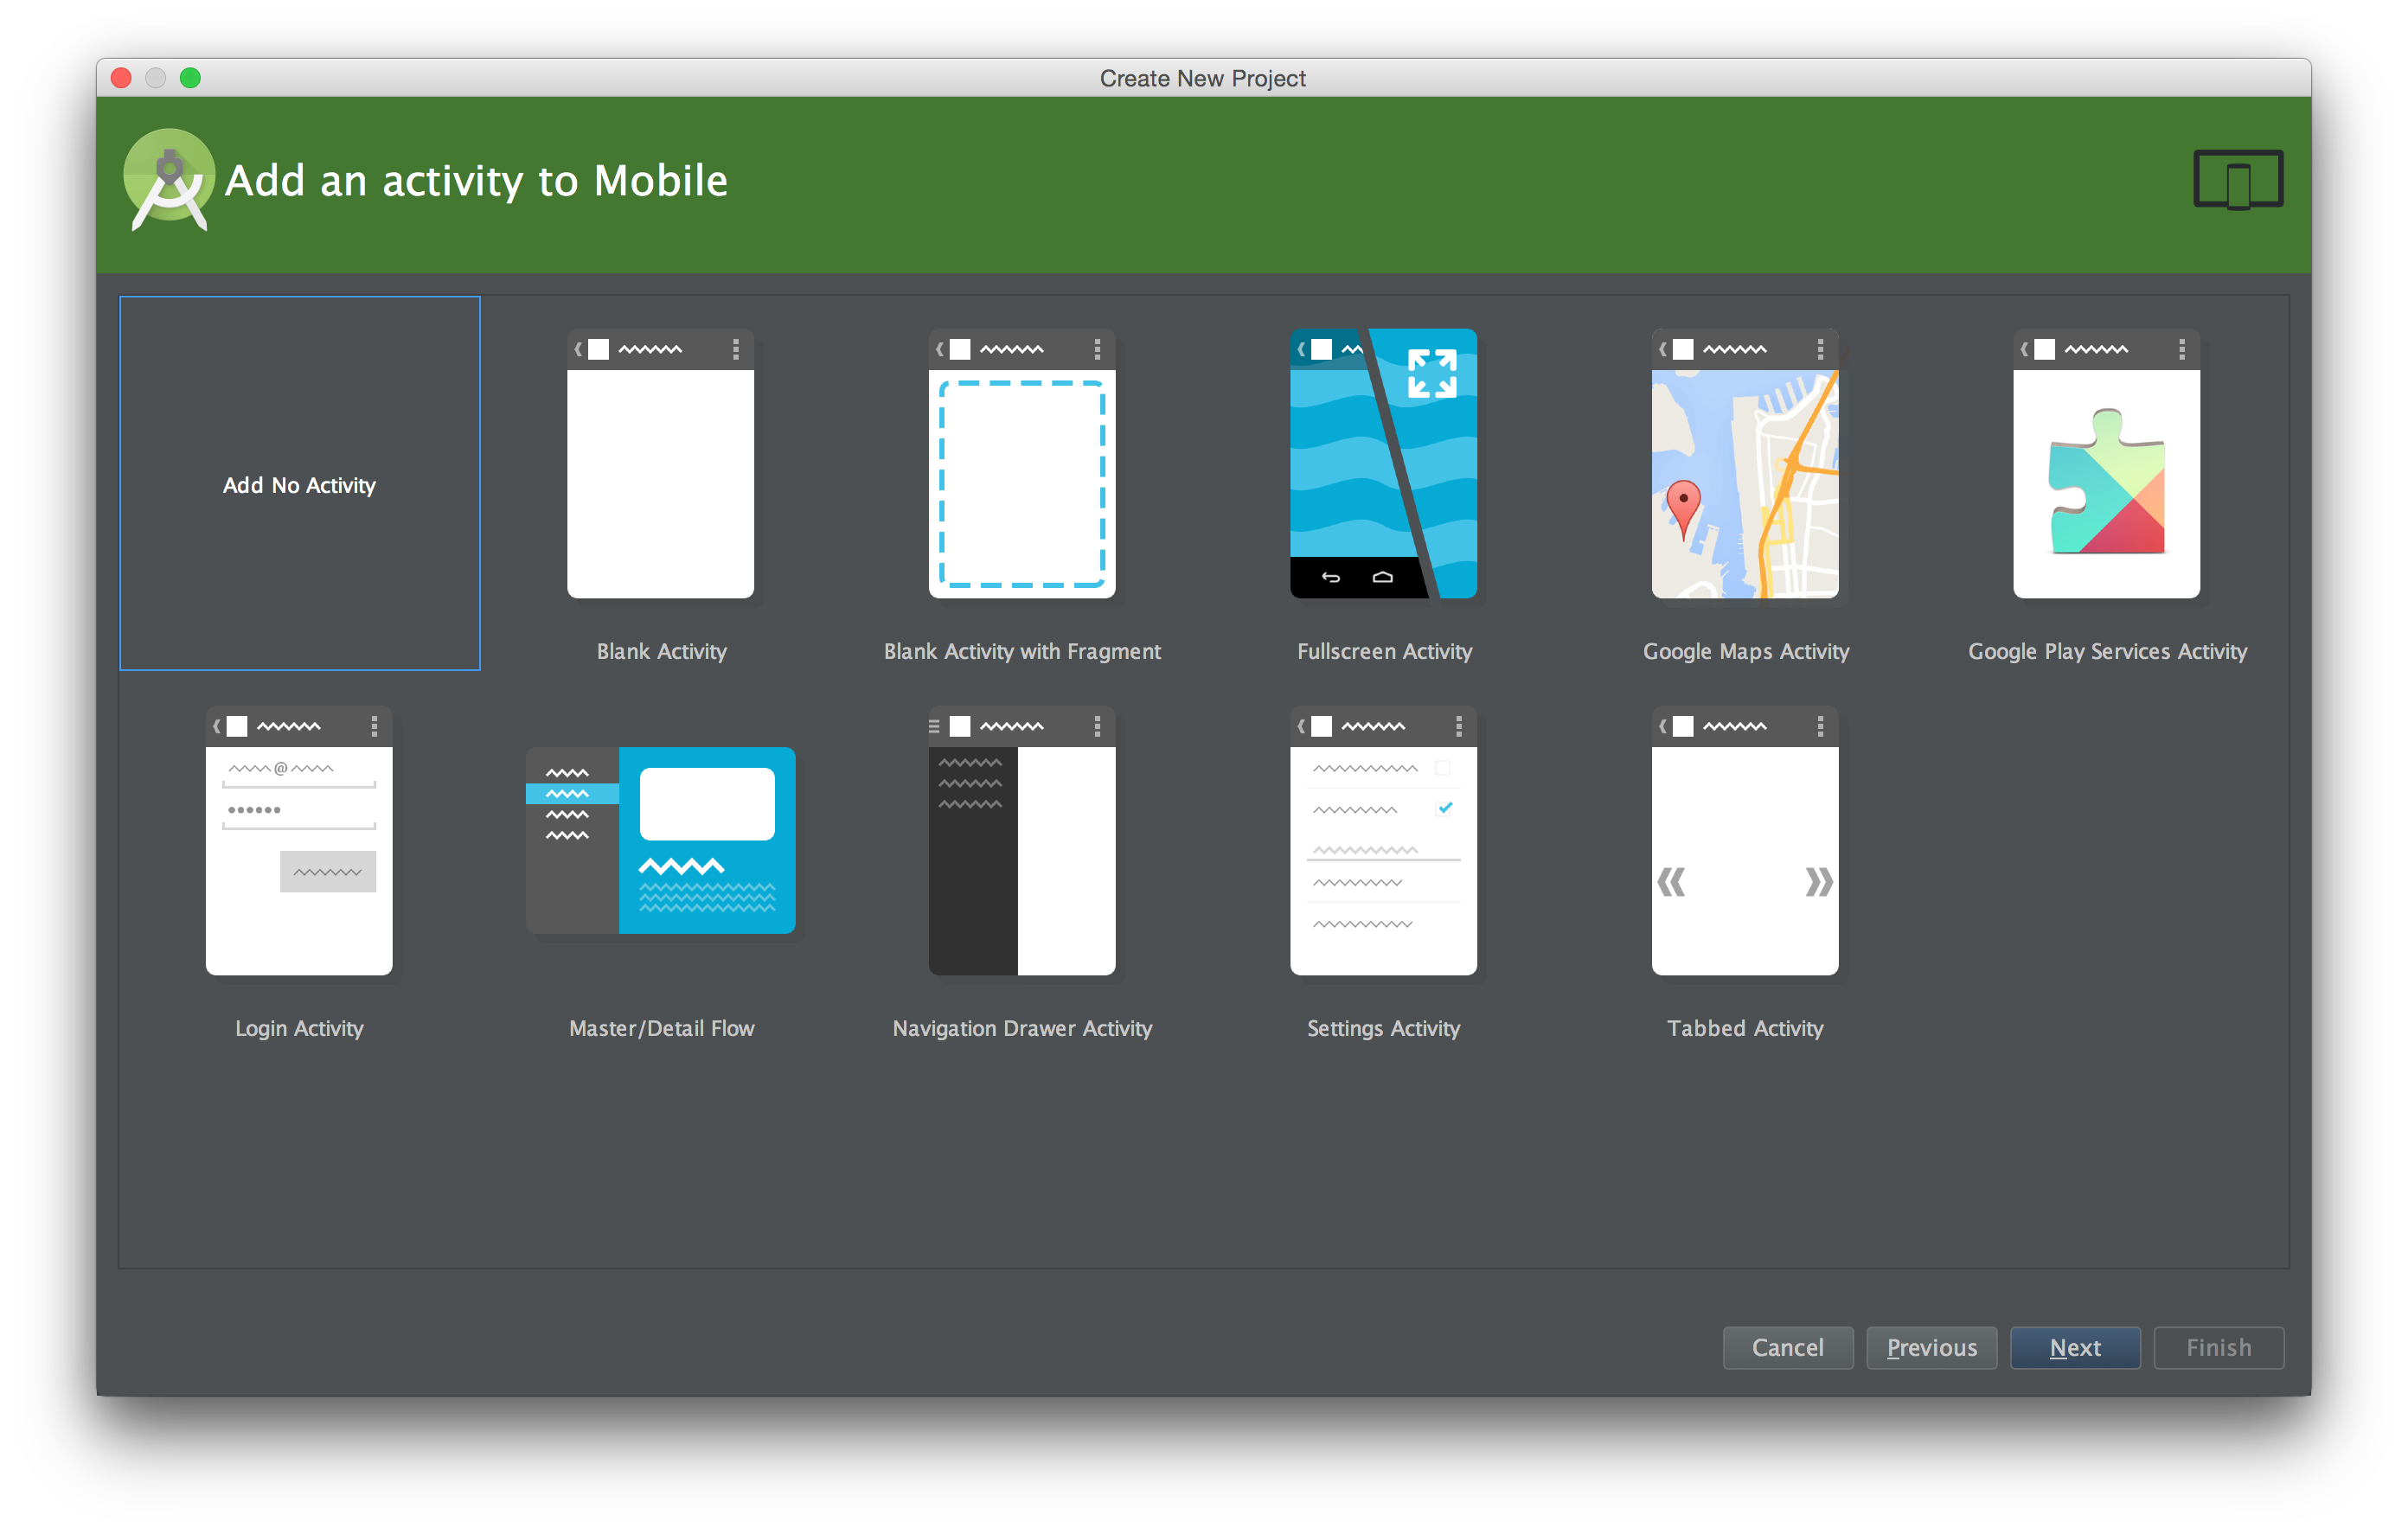
Next, you won't need any activity created, so from the Add an activity windows (both mobile and wear), select Add no activity.
Lastly, click Finish and everything is set to proceed to the implementation. You will notice that two modules were created - mobile and wear.
The following implementation details are specific only to the wear module.
Extending the CanvasWatchFaceService
In order to implement a watchface you need two core components:
- CanvasWatchFaceService - the base class for watch faces which draw on a Canvas
- CanvasWatchFaceService.Engine - the actual implementation of a watch face
Start by creating a SimpleWatchFaceService class in your wear/src/main/java/yourpackage folder. This class will extend CanvasWatchFaceService and it will be the entry point of the wear application.
public class SimpleWatchFaceService extends CanvasWatchFaceService {

    @Override
    public Engine onCreateEngine() {
        return new SimpleEngine();
    }

    private class SimpleEngine extends CanvasWatchFaceService.Engine {

    }
}
As you can see the SimpleWatchFaceService implements a single method - onCreateEngine() that returns your actual implementation of CanvasWatchFaceService.Engine.
Before proceeding to the actual implementation of the engine, you must register the service in AndroidManifest.xml of the wear app. Your manifest should look like this:
<manifest xmlns:android="http://schemas.android.com/apk/res/android"
  package="com.catinean.simpleandroidwatchface">

  <uses-feature android:name="android.hardware.type.watch" />

  <uses-permission android:name="com.google.android.permission.PROVIDE_BACKGROUND" />
  <uses-permission android:name="android.permission.WAKE_LOCK" />

  <application
    android:allowBackup="true"
    android:label="@string/app_name"
    android:icon="@mipmap/ic_launcher"
    android:theme="@android:style/Theme.DeviceDefault">

    <service
      android:name=".SimpleWatchFaceService"
      android:label="@string/app_name"
      android:permission="android.permission.BIND_WALLPAPER">
      <meta-data
        android:name="android.service.wallpaper"
        android:resource="@xml/watch_face" />
      <meta-data
        android:name="com.google.android.wearable.watchface.preview"
        android:resource="@drawable/preview_rectangular" />

      <meta-data
        android:name="com.google.android.wearable.watchface.preview_circular"
        android:resource="@drawable/preview_circular" />

      <intent-filter>
        <action android:name="android.service.wallpaper.WallpaperService" />
        <category android:name="com.google.android.wearable.watchface.category.WATCH_FACE" />
      </intent-filter>
    </service>

  </application>

</manifest>
As you can see, the watch face requires two permissions:
com.google.android.permission.PROVIDE_BACKGROUNDandroid.permission.WAKE_LOCK
Moreover, the service has the android.permission.BIND_WALLPAPER permission and a series of meta-data that define a watch_face resource and preview images for rectangular and circular form factors (com.google.android.wearable.watchface.preview and com.google.android.wearable.watchface.preview_circular). The preview images are usually obtained as a screenshot after you fully implement the watchface and they are used as images when picking the watchface from your smartwatch.
The watch_face resource must be defined in wear/src/main/res/xml/watch_face.xml and it is a simple wallpaper resource:
<?xml version="1.0" encoding="UTF-8"?>
<wallpaper />
Implementing the SimpleEngine
As I said before, the SimpleEngine is an implementation of CanvasWatchFaceService.Engine which actually draws your watch face on the canvas and also contains a series of useful callbacks.
First things first, the engine provides an onCreate(SurfaceHolder holder) method where you can define your watch face style and other graphical elements. In defining the watch face style, you can customise how the UI elements such as the battery indicator are drawn over the watch face or how the cards are behaving in both normal and ambient mode. In order to make use of all of these you must call the setWatchFaceStyle (WatchFaceStyle watchFaceStyle) method. Our SimpleEngine class will look like this:
private class SimpleEngine extends CanvasWatchFaceService.Engine {
        @Override
        public void onCreate(SurfaceHolder holder) {
            super.onCreate(holder);

            setWatchFaceStyle(new WatchFaceStyle.Builder(SimpleWatchFaceService.this)
                  .setCardPeekMode(WatchFaceStyle.PEEK_MODE_SHORT)
                  .setAmbientPeekMode(WatchFaceStyle.AMBIENT_PEEK_MODE_HIDDEN)
                  .setBackgroundVisibility(WatchFaceStyle.BACKGROUND_VISIBILITY_INTERRUPTIVE)
                  .setShowSystemUiTime(false)
                  .build());
        }
    }
We are using different WatchFaceStyle constants to define various behaviour:
setCardPeekMode(WatchFaceStyle.PEEK_MODE_SHORT)- this will specify that the first card peeked and shown on the watch will have a single line tail (i.e. it will have small height)setAmbientPeekMode(WatchFaceStyle.AMBIENT_PEEK_MODE_HIDDEN)- when the watch enters in ambient mode, no peek card will be visiblesetBackgroundVisibility(WatchFaceStyle.BACKGROUND_VISIBILITY_INTERRUPTIVE)- the background of the peek card should only be shown briefly, and only if the peek card represents an interruptive notificationsetShowSystemUiTime(false)- we set the UI time tofalsebecause we will already show the time on the watch by drawing it onto the canvas
With these 4 settings in place, we are done defining our custom watch face style. Next, we are going to explore the callbacks of the engine.
Engine callbacks
The CanvasWatchFaceService.Engine provides a series of callbacks that can be implemented in order to better understand the behaviour of the watch.
onDraw(Canvas canvas, Rect bounds)- probably the most important callback, this is called every time the watch face is invalidated. Here we will define the draw logic of the watch face using the providedCanvasand theRectthat defines the watch face bounds.onTimeTick()- this callback is invoked every minute when the watch is in ambient mode. It is very important to consider that this callback is only invoked while on ambient mode, as it's name is rather confusing suggesting that this callbacks every time. This being said, usually, here we will have only toinvalidate()the watch in order to triggeronDraw(). In order to keep track of time outside ambient mode, we will have to provide our own mechanism.onVisibilityChanged(boolean visible)- this is called when the watch becomes visible or not. If we decide to override this callback, we have to call firstsuper.onVisibilityChanged(visible).onAmbientModeChanged(boolean inAmbientMode)- called when the device enters or exits ambient mode. While on ambient mode, one should be considerate to preserve battery consumption by providing a black and white display and not provide any animation such as displaying seconds.void onPeekCardPositionUpdate(Rect rect)- called when the first, peeking card positions itself on the screen. Therectprovides information about the position of the card when it's peeking at the bottom and allowing the watch face to be exposed. Here you can change the watch face appearance depending on where the card is on the screen.onPropertiesChanged(Bundle properties)- called when the properties of the device are determined. For example, the bundle contains properties to indicate if burn-in protection is required (PROPERTY_BURN_IN_PROTECTION) or whether the device has a low-bit ambient mode (PROPERTY_LOW_BIT_AMBIENT).
Managing time
One of the most important part of building a watch face is to properly manage time, of course. As we've seen before in the engine callbacks, onTimeTick() is only called in ambient mode, every minute. What can we do in order to get notified every minute when the device is not in ambient mode? The official documentation mentions that you have to provide your custom time management system. The example presents the use of a Handler in order to schedule periodic ticks. We are using a Handler as opposed to a Timer with a TimerTask because the later will execute the job on a separate thread, but we want it to be executed on the main thread as we are going go call invalidate() as seen above. Our SimpleEngine will look like this:
private class SimpleEngine extends CanvasWatchFaceService.Engine {

        private static final long TICK_PERIOD_MILLIS = TimeUnit.SECONDS.toMillis(1);
        private Handler timeTick;

        @Override
        public void onCreate(SurfaceHolder holder) {
            super.onCreate(holder);

            ...

            timeTick = new Handler(Looper.myLooper());
            startTimerIfNecessary();
        }

        private void startTimerIfNecessary() {
            timeTick.removeCallbacks(timeRunnable);
            if (isVisible() && !isInAmbientMode()) {
                timeTick.post(timeRunnable);
            }
        }

        private final Runnable timeRunnable = new Runnable() {
            @Override
            public void run() {
                onSecondTick();

                if (isVisible() && !isInAmbientMode()) {
                    timeTick.postDelayed(this, TICK_PERIOD_MILLIS);
                }
            }
        };

        private void onSecondTick() {
            invalidateIfNecessary();
        }

        private void invalidateIfNecessary() {
            if (isVisible() && !isInAmbientMode()) {
                invalidate();
            }
        }

        @Override
        public void onVisibilityChanged(boolean visible) {
            super.onVisibilityChanged(visible);
            startTimerIfNecessary();
        }


        @Override
        public void onAmbientModeChanged(boolean inAmbientMode) {
            super.onAmbientModeChanged(inAmbientMode);
            startTimerIfNecessary();
        }

        @Override
        public void onTimeTick() {
            super.onTimeTick();
            invalidate();
        }

        @Override
        public void onDestroy() {
            timeTick.removeCallbacks(timeRunnable);
            super.onDestroy();
        }
}
In order to manage time, in our case we want to tick each second, two actors are involved:
timeTick- aHandlerthat will post a runnable only if the watch is visible and not in ambient mode (seestartTimerIfNecessary()) in order to start ticking.timeRunnable- the actual runnable posted bytimeTickhandler. It invalidates the watch and schedules another run of itself on the handler with a delay of one second (since we want to tick every second) if necessary.
As you can see, we want to invalidate the watch (i.e. schedule a draw) only when it is visible and not in ambient mode (our custom timer should tick only in this case). There is no reason to draw while the watch is not visible and, as we've seen above, the ambient mode tick has its own callback - onTimeTick() which is called every minute and where we just invoke invalidate() in order to schedule a draw.
In onDestroy() we want to remove all the callbacks to the handler in order stop it ticking.
Drawing the time and date
In order to actually draw the watch face, you must override the onDraw(Canvas canvas, Rect bounds) method of the SimpleEngine. Here we will perform all the drawing operations on the canvas. However, we will create another class - SimpleWatchFace that will be responsible with drawing the watch face in order not to clutter the engine.
For drawing on the canvas we will need:
- a
Paintthat will hold all the information needed in order to draw (such as size, colour, antialising, etc) - a
Timeobject for simplicity (as an alternative you could useDateorCalendar) in order to get hold of the current hour, minute, second and date
public class SimpleWatchFace {

    private static final String TIME_FORMAT_WITHOUT_SECONDS = "%02d.%02d";
    private static final String TIME_FORMAT_WITH_SECONDS = TIME_FORMAT_WITHOUT_SECONDS + ".%02d";
    private static final String DATE_FORMAT = "%02d.%02d.%d";

    private final Paint timePaint;
    private final Paint datePaint;
    private final Time time;

    private boolean shouldShowSeconds = true;

    public static SimpleWatchFace newInstance(Context context) {
        Paint timePaint = new Paint();
        timePaint.setColor(Color.WHITE);
        timePaint.setTextSize(context.getResources().getDimension(R.dimen.time_size));
        timePaint.setAntiAlias(true);

        Paint datePaint = new Paint();
        datePaint.setColor(Color.WHITE);
        datePaint.setTextSize(context.getResources().getDimension(R.dimen.date_size));
        datePaint.setAntiAlias(true);

        return new SimpleWatchFace(timePaint, datePaint, new Time());
    }

    SimpleWatchFace(Paint timePaint, Paint datePaint, Time time) {
        this.timePaint = timePaint;
        this.datePaint = datePaint;
        this.time = time;
    }

    public void draw(Canvas canvas, Rect bounds) {
        time.setToNow();
        canvas.drawColor(Color.BLACK);

        String timeText = String.format(shouldShowSeconds ? TIME_FORMAT_WITH_SECONDS : TIME_FORMAT_WITHOUT_SECONDS, time.hour, time.minute, time.second);
        float timeXOffset = computeXOffset(timeText, timePaint, bounds);
        float timeYOffset = computeTimeYOffset(timeText, timePaint, bounds);
        canvas.drawText(timeText, timeXOffset, timeYOffset, timePaint);

        String dateText = String.format(DATE_FORMAT, time.monthDay, (time.month + 1), time.year);
        float dateXOffset = computeXOffset(dateText, datePaint, bounds);
        float dateYOffset = computeDateYOffset(dateText, datePaint);
        canvas.drawText(dateText, dateXOffset, timeYOffset + dateYOffset, datePaint);
    }

    private float computeXOffset(String text, Paint paint, Rect watchBounds) {
        float centerX = watchBounds.exactCenterX();
        float timeLength = paint.measureText(text);
        return centerX - (timeLength / 2.0f);
    }

    private float computeTimeYOffset(String timeText, Paint timePaint, Rect watchBounds) {
        float centerY = watchBounds.exactCenterY();
        Rect textBounds = new Rect();
        timePaint.getTextBounds(timeText, 0, timeText.length(), textBounds);
        int textHeight = textBounds.height();
        return centerY + (textHeight / 2.0f);
    }

    private float computeDateYOffset(String dateText, Paint datePaint) {
        Rect textBounds = new Rect();
        datePaint.getTextBounds(dateText, 0, dateText.length(), textBounds);
        return textBounds.height() + 10.0f;
    }

    public void setAntiAlias(boolean antiAlias) {
        timePaint.setAntiAlias(antiAlias);
        datePaint.setAntiAlias(antiAlias);
    }

    public void setColor(int color) {
        timePaint.setColor(color);
        datePaint.setColor(color);
    }

    public void setShowSeconds(boolean showSeconds) {
        shouldShowSeconds = showSeconds;
    }
}
We first create the Paint objects for both the time and date and the Time object. Afterwards, we create a draw(Canvas canvas, Rect bounds) method that will actually draw the time on the canvas. In this method, we start by placing the time to the current time (time.setToNow()), drawing the black background and then drawing the time and date. We make use of the canvas.drawText(String text, float x, float y, Paint paint) method in order to paint the time and date strings. Moreover, we create some helper methods in order to compute the x and y offset of both time and date drawings.
The setAntiAlias(boolean antiAlias), setColor(int color) and setShowSeconds(boolean showSeconds) methods will be used in order to differentiate the drawing between interactive mode and ambient mode.
We use the SimpleWatchFace class in our SimpleEngine as follows:
private class SimpleEngine extends CanvasWatchFaceService.Engine {

        ...

        private SimpleWatchFace watchFace;

        @Override
        public void onCreate(SurfaceHolder holder) {
            super.onCreate(holder);

            ...

            watchFace = SimpleWatchFace.newInstance(SimpleWatchFaceService.this);
        }

        ...

        @Override
        public void onDraw(Canvas canvas, Rect bounds) {
            super.onDraw(canvas, bounds);
            watchFace.draw(canvas, bounds);
        }

        @Override
        public void onAmbientModeChanged(boolean inAmbientMode) {
            super.onAmbientModeChanged(inAmbientMode);
            watchFace.setAntiAlias(!inAmbientMode);
            watchFace.setColor(inAmbientMode ? Color.GRAY : Color.WHITE);
            watchFace.setShowSeconds(!isInAmbientMode());
            invalidate();

           ...
        }

    }
In onDraw() we simply invoke the draw() method on the watchFace object. Moreover, when the watch is in ambient mode we do not anti alias the text and we do not show the seconds in order to minimize the amount of animations (draws) for battery performance and we set the color to gray.
Now you can run your watch face on an emulator (or device - here you can find how to debug your device over Bluetooth) . Don't forget to select it after it has been installed.
The next part will focus on further customisations by providing a Settings activity and optimisations of the watch face.
All the sources all available on Github